
")
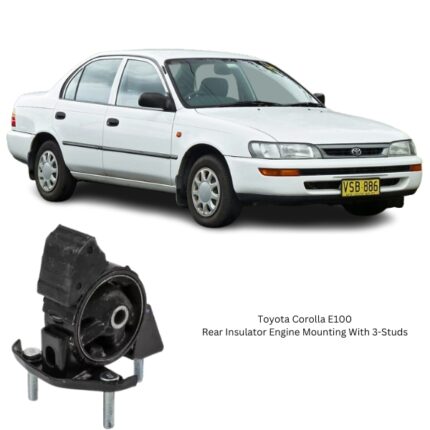
Get Toyota Corolla E100 Rear Insulator Engine Mounting With 3-Studs 12371-15241 in Kenya
The Rear Insulator Engine Mounting with 3-Studs is a vital structural and vibration-damping component within the engine mounting system. It serves as a secure rear anchor point for the engine or transmission assembly and plays a critical role in minimizing movement, controlling vibrations, and maintaining alignment of the powertrain relative to the chassis.
This particular variant, featuring a 3-stud mounting configuration, offers enhanced load distribution and stability. The multiple studs are strategically positioned to provide a secure grip on the chassis frame or engine bracket, making it ideal for applications where additional mounting strength and resistance to torque-induced motion are required.
Primary Functions and Role
The rear insulator engine mount with 3-studs serves several key mechanical and comfort-enhancing roles:
-
Structural Support: It helps carry the weight of the engine and transmission at the rear and distributes it evenly across the mounting points.
-
Vibration Isolation: It absorbs and dampens vibrations generated during engine operation, preventing them from reaching the cabin.
-
Torque Control: It counteracts the twisting and shifting of the engine during acceleration, deceleration, and gear changes.
-
Motion Restriction: It limits excessive engine movement along the longitudinal axis (front-to-back) and assists in preserving driveline geometry.
-
Component Protection: It minimizes mechanical stress on connected parts like driveshafts, exhaust components, and electrical wiring.
A reliable rear engine mount is essential for maintaining vehicle stability, driveline alignment, and ride comfort.
3-Stud Configuration Advantage
The defining feature of this mount is its three-stud mounting base, which enhances both security and load-bearing performance:
-
Improved Load Distribution: Three anchoring points provide greater surface contact and distribute engine weight and stress more evenly across the chassis.
-
Enhanced Stability: Reduces the chances of mount twisting or loosening under high torque conditions.
-
Vibration Damping Efficiency: Allows for a more stable placement of the damping element (elastomer or hydraulic), improving overall vibration control.
-
Resistance to Loosening: Extra studs mean more fastening points, which reduces the risk of movement or fastener failure over time.
This configuration is ideal for modern vehicles with higher engine outputs and more refined ride demands.
Construction and Materials
The Rear Insulator Engine Mounting with 3-Studs is engineered from robust materials to withstand constant stress, exposure to heat and fluids, and long-term vibration cycles.
Main Components:
-
Bracket and Base Plate
Typically made of forged steel or cast aluminum, the bracket includes the three threaded studs integrated into its base. These studs ensure firm attachment to the chassis or subframe. -
Elastomeric Core
A rubber or synthetic polyurethane isolator is vulcanized to the metal housing. It is designed to flex under load, absorb vibrations, and limit motion. -
Central Bushing or Sleeve
A steel or aluminum sleeve runs through the mount’s center, allowing a bolt connection to the engine or transmission component. It acts as a pivot point and load transfer medium. -
Hydraulic Damping Chamber (in advanced variants)
Some versions incorporate a sealed fluid-filled cavity that enhances vibration damping, particularly at idle or low-frequency oscillations. -
Protective Finishes and Shields
Anti-corrosion coatings, as well as optional heat shields, extend service life by protecting against rust, road debris, and high temperatures from nearby exhaust or engine components.
These materials work together to deliver long-lasting performance and comfort.
Performance Attributes
A well-functioning rear engine mount with 3-studs offers a range of performance benefits:
-
Superior Vibration Absorption: Isolates engine vibration and reduces cabin noise.
-
Controlled Engine Movement: Prevents the engine from excessively tilting or shifting during driving.
-
Durability: Designed to resist cracking, tearing, and fatigue over thousands of driving cycles.
-
Chemical Resistance: Stands up to oil, transmission fluid, coolant, and road contaminants.
-
Thermal Stability: Maintains structural integrity in high-heat environments.
These attributes contribute to smoother engine operation and improved overall driving dynamics.
Common Signs of Failure
Even though it’s built for longevity, the rear insulator mount is subject to wear. Warning signs of a failing mount include:
-
Excessive Vibration
A worn rubber insulator or collapsed hydraulic chamber allows engine vibrations to be felt inside the cabin. -
Clunking or Impact Sounds
If the mount’s rubber separates or compresses too much, metal-to-metal contact may occur during gear shifts or sudden acceleration. -
Visible Damage or Deformation
Cracks, tears, or misalignment in the rubber element are clear indicators of wear. -
Engine Rock or Tilt
The engine may move excessively under throttle or appear tilted when the mount is compromised. -
Hydraulic Fluid Leaks
In fluid-filled designs, leakage indicates a ruptured internal chamber, immediately reducing damping performance. -
Accelerated Wear of Adjacent Parts
Broken or sagging mounts may stress driveshafts, exhaust components, or cooling lines.
Prompt attention to these symptoms can prevent additional component damage.
Installation Procedure
Replacing the rear insulator engine mounting requires proper support of the powertrain and alignment precision. General steps include:
-
Safety Measures
Ensure the vehicle is on a flat surface, parking brake engaged, and the battery disconnected. -
Support the Engine or Transmission
Use a hydraulic jack or engine support brace to relieve load from the mount before removal. -
Access the Mount
Remove underbody covers, brackets, or components obstructing access to the mount. -
Remove Mount Fasteners
Unbolt the mount from the chassis and engine. Pay attention to the orientation of the three studs. -
Install New Mount
Position the new mount, align the studs with the holes on the subframe, and hand-tighten nuts to hold it in place. -
Torque Specifications
Use a torque wrench to tighten all bolts and nuts to the manufacturer’s specifications. -
Re-check Alignment
Verify that the engine remains level and properly aligned with other mounts before completing reassembly. -
Test Drive
After installation, perform a road test to check for smooth operation, noise reduction, and proper engine behavior.
Maintenance and Inspection
Although the mount is a non-serviceable part, visual inspections during regular service intervals can help catch early wear signs:
-
Check for cracking or bulging of the rubber
-
Look for signs of oil saturation, which can degrade the elastomer
-
Confirm tightness of the 3-stud mounting hardware
-
Inspect for abnormal engine tilt or shifting
Regular monitoring ensures reliability and helps avoid more complex drivetrain issues.
Benefits of Timely Replacement
-
Restores Engine Stability: Reduces unwanted movement and restores proper alignment.
-
Improves Ride Quality: Reduces vibration, noise, and harshness felt by the driver and passengers.
-
Protects Adjacent Components: Prevents stress-related damage to hoses, wiring, exhaust, and transmission parts.
-
Extends Vehicle Life: Maintains drivetrain health and reduces wear on other mounts.
-
Enhances Safety: Prevents sudden engine movement during hard braking or acceleration.
Follow us on Facebook for more parts.
Reviews
Clear filtersThere are no reviews yet.