-13%

Mazda Premacy Rear Brake Pad Kit D3132
Part No: D3132
Brand: MK
Fits: Mazda Premacy / Axela / Volvo V40
Fitting Position: Rear Axle
Price per set
KSh 4,000.00 Original price was: KSh 4,000.00.KSh 3,500.00Current price is: KSh 3,500.00.
Payment Methods:
In the realm of vehicle safety and performance, brake pads are among the most critical components. While front brakes typically bear the brunt of the stopping force, the rear brake pads play an equally important role in balancing deceleration, stabilizing the vehicle, and providing full stopping power. The Rear Brake Pad Kit, a set of high-friction pads installed in the rear brake calipers, is vital for smooth, controlled, and consistent braking performance.
Brake pads are wear-and-tear items—designed to gradually erode with use to protect more expensive parts like rotors and calipers. Regular inspection and timely replacement of rear brake pads are crucial for maintaining optimal braking efficiency and ensuring safe driving in all conditions.
A Rear Brake Pad Kit typically includes two pairs (four individual pads) of brake pads—two for each rear wheel. These pads are mounted inside the brake caliper housing and press against the brake rotor when the brake pedal is applied. The resulting friction slows the rotation of the wheels and brings the vehicle to a stop.
Some kits may also include:
Anti-rattle clips
Shims
Wear sensors
High-temperature grease
The pads are usually made from high-friction materials bonded to a metal backing plate. These materials vary depending on the application, vehicle type, and desired performance characteristics.
Deceleration Support
Rear brake pads provide supplementary stopping power, especially in emergency braking and steep descents.
Vehicle Stability
They help prevent rear-end skidding and maintain balance during braking, especially in wet or slippery conditions.
Parking Brake Function
On many vehicles, especially those with disc brakes in the rear, the parking brake operates via the rear brake pads.
Load Distribution
Rear pads absorb part of the braking force, reducing the burden on front brakes and contributing to even wear.
Semi-Metallic
Contains 30–60% metal. Offers excellent heat resistance and durability. Common in performance and heavier vehicles.
Ceramic
Made of ceramic fibers and copper. Quiet, clean, and long-lasting with low dust production. Ideal for daily driving.
Organic (Non-Asbestos Organic – NAO)
Composed of fibers, resins, and fillers. Softer, quieter, and more affordable, but wears faster and creates more dust.
Low-Metallic NAO
Mix of organic compounds with added metal for improved heat transfer and stopping power.
A good set of rear pads enhances stopping power, shortens braking distance, and provides consistent results in all driving conditions.
Rear brakes prevent the vehicle from pitching forward during hard stops and maintain rear-end traction.
Premium pads are engineered to create less abrasive wear on the rotors, extending rotor lifespan and reducing maintenance costs.
Quality pads are designed with built-in noise-dampening features, such as chamfered edges, slots, and shims, for a quieter braking experience.
Ceramic and advanced semi-metallic pads significantly reduce brake dust, keeping wheels cleaner and improving aesthetic appeal.
High-quality pads dissipate heat effectively, reducing the risk of brake fade and improving braking under repeated heavy use.
Worn-out pads reduce stopping power and increase braking distances, particularly under load or at high speeds.
Thin or degraded pads allow metal-on-metal contact, rapidly damaging rotors and leading to costly repairs.
Low-quality or worn pads can produce squealing, grinding, or rattling sounds—often signaling urgent maintenance needs.
Inadequate heat resistance can lead to brake fade, where pads lose effectiveness after repeated or prolonged use.
Faulty rear pads can cause imbalanced braking, leading to instability, especially in slippery conditions.
Squealing, screeching, or grinding noises when braking
Brake warning light or sensor activation (on modern vehicles)
Soft or spongy brake pedal feel
Reduced braking responsiveness
Visible pad thickness below 3 mm
Vibration or pulsation during braking
Uneven or rapid wear on the pads or rotors
Brake dust accumulation increasing
Tools Required:
Jack and jack stands
Lug wrench
Socket set and ratchet
C-clamp or brake caliper tool
Brake cleaner
Torque wrench
Flathead screwdriver
High-temp brake grease
Prepare the Vehicle
Park on a level surface, engage the handbrake, and loosen rear lug nuts.
Lift and Secure
Raise the vehicle with a jack and secure it with jack stands. Remove the wheels.
Access the Brake Caliper
Unbolt the brake caliper and suspend it using a hanger to avoid straining the brake line.
Remove Old Pads
Slide the old pads out of the caliper bracket. Inspect the rotor and hardware for wear or damage.
Compress the Caliper Piston
Use a C-clamp or caliper tool to push the piston back into the caliper, making room for the new pads.
Install New Pads
Apply brake grease to the contact points (not on the pad surface) and install the new pads.
Reassemble
Reattach the caliper, tighten bolts to manufacturer torque specs, and reinstall the wheel.
Repeat on the Other Side
Always replace pads on both sides of the axle to maintain even braking.
Test the Brakes
Before driving, pump the brake pedal to seat the new pads. Check for firm pedal feel.
Break-In (Bedding) Process
Perform a proper bedding-in procedure to condition the pads and rotors for optimal performance.
Check brake pads every 10,000–15,000 km or as per vehicle service intervals.
Never mix old and new pads—always replace as a complete set.
Replace rotors if they are deeply scored, warped, or below thickness specification.
Use quality brake fluid and check the level during pad replacement.
Clean all parts before reassembly to ensure proper movement and avoid brake noise.
While the principle is the same, rear pads are usually:
Slightly smaller (since they do less work than the front)
Subjected to less intense braking
More likely integrated with the parking brake system
Despite these differences, rear pads must not be neglected as they are essential to overall brake system performance and vehicle safety.
Follow us on Facebook for more parts.
No account yet?
Create an Account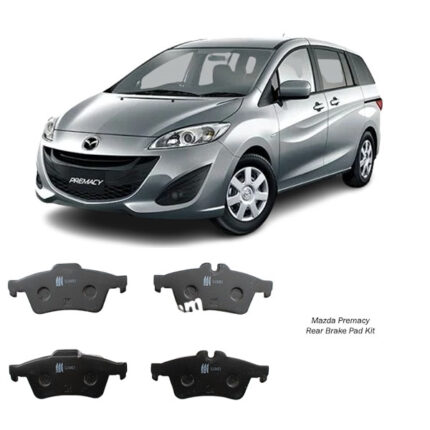
TEAM ONESTOP
Typically replies within minutes
Looking for parts?
Team Onestop
Car Parts Specialists
🟢 Online
WhatsApp us