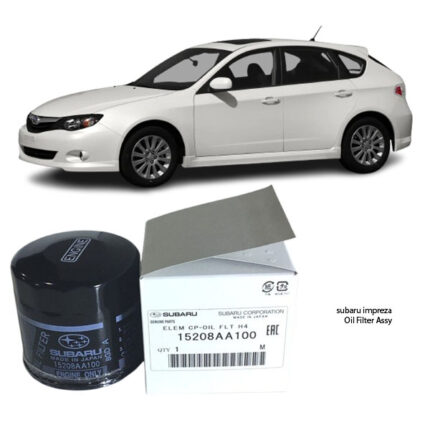
Get Subaru Impreza Oil Filter Element Assy 15208-AA100 in Kenya
An oil filter element assembly is a crucial component in your vehicle’s lubrication system, ensuring clean oil circulates through the engine. It plays a significant role in protecting your engine by trapping dirt, metal particles, and other contaminants that could cause damage over time.
If you’re looking to understand how an oil filter element assembly works, when to replace it, and how to choose the right one, this guide covers everything you need to know in 1000 words. Let’s dive in!
What is an Oil Filter Element Assembly?
The oil filter element assembly is a filter unit that removes impurities from the engine oil, ensuring it remains clean and effective for lubrication.
Components of an Oil Filter Element Assembly
Filter Element – The core filtering material (usually made of cellulose, synthetic fiber, or micro-glass) that traps contaminants
Outer Casing (Metal Canister or Housing) – Protects the internal filter and holds the pressurized oil
Bypass Valve – Ensures oil flow continues if the filter gets clogged
Anti-Drain Back Valve – Prevents oil from draining out when the engine is off, ensuring instant lubrication on startup
Sealing Gasket – Prevents oil leaks where the filter connects to the engine
This assembly works continuously to keep engine oil clean and free from contaminants that can cause wear and tear.
Function of an Oil Filter Element Assembly
A healthy oil filter is essential for:
Removing Contaminants – Filters out dirt, metal shavings, and sludge
Maintaining Oil Cleanliness – Prevents oil breakdown for efficient lubrication
Enhancing Engine Performance – Reduces internal friction for smooth operation
Prolonging Engine Life – Prevents premature wear of internal components
Ensuring Proper Oil Circulation – Regulates oil flow to all engine parts
Without a properly functioning oil filter, engine performance can decline, and damage can occur due to contaminated oil.
Types of Oil Filter Elements
Oil filters come in different types based on materials and functionality.
Spin-On Oil Filters
Most common type
Includes a metal housing with a replaceable filter element inside
Easy to install and replace
Cartridge (Element) Oil Filters
Environmentally friendly since only the filter element is replaced
No metal casing – only the filter element is changed
Found in many modern vehicles
Magnetic Oil Filters
Uses magnets to trap metal particles
Usually combined with traditional filter materials
Best for high-performance and heavy-duty vehicles
High-Performance Synthetic Oil Filters
Made with synthetic materials for better filtration
Lasts longer than standard filters
Ideal for synthetic oil users
Choosing the right oil filter depends on your vehicle type, oil type, and driving conditions.
Signs You Need to Replace Your Oil Filter
A clogged or failing oil filter can cause serious engine issues. Look for these warning signs:
Dirty or Dark Oil – Check the dipstick; if the oil is black and sludgy, your filter may not be working properly
Oil Pressure Warning Light – A clogged filter can cause low oil pressure
Engine Overheating – Poor oil circulation leads to excessive heat buildup
Unusual Engine Noises – Knocking or ticking sounds can indicate oil starvation
Reduced Engine Performance – Sluggish acceleration and reduced power
Ignoring these signs can lead to severe engine damage!
How Often Should You Change Your Oil Filter?
General Replacement Intervals:
Every 5,000 – 10,000 km (3,000 – 6,000 miles) for regular oil
Every 10,000 – 15,000 km (6,000 – 9,000 miles) for synthetic oil
Driving Conditions That Require More Frequent Oil Filter Changes:
Stop-and-go traffic – More frequent engine load cycles
Dusty or Off-Road Driving – Increased contaminants in the oil
High-Performance Driving – Higher engine stress requires better lubrication
Always follow your vehicle manufacturer’s recommendations for oil and filter changes.
How to Replace an Oil Filter?
Replacing an oil filter is a simple DIY task if you have the right tools.
Tools Needed:
Oil filter wrench
Drain pan
New oil filter
Fresh engine oil
Shop rags & gloves
Step-by-Step Replacement Process:
Warm Up the Engine – Helps oil flow out easily
Lift the Vehicle – Use jack stands for safety
Drain the Old Oil – Remove the drain plug and let the oil flow out
Remove the Old Oil Filter – Use an oil filter wrench to unscrew it
Prepare the New Filter – Apply a small amount of fresh oil to the rubber gasket
Install the New Oil Filter – Hand-tighten it securely
Refill with Fresh Oil – Pour in the recommended amount of new oil
Check for Leaks & Start the Engine – Run the engine for a few minutes and inspect for leaks
Check the Oil Level – Use the dipstick to ensure proper oil levels
Pro Tip: Always dispose of used oil and filters responsibly at a recycling center!
Best Oil Filter Brands for Your Vehicle
Choosing a high-quality oil filter ensures maximum engine protection.
OEM Oil Filters (Toyota, Honda, Nissan, Ford, etc.) – Best for factory-recommended performance
Bosch Oil Filters – Advanced filtration and durability
Mobil 1 Extended Performance Filters – Long-lasting with synthetic media
K&N Performance Oil Filters – Ideal for high-performance vehicles
Fram Ultra Synthetic Filters – Excellent for synthetic oil users
WIX Oil Filters – High-quality and widely trusted
Tip: Always verify compatibility with your vehicle’s make and model before purchasing an oil filter.
Oil Filter Maintenance Tips for Longer Engine Life
Always Replace the Oil Filter When Changing Oil – A dirty filter with fresh oil is ineffective
Use the Right Type of Oil Filter – Refer to your owner’s manual
Check for Leaks After Replacement – A loose or damaged gasket can cause leaks
Inspect the Filter During Oil Changes – Look for metal shavings or excessive sludge
Change Oil Regularly – Clean oil prolongs filter and engine life
A well-maintained oil filter ensures optimal engine health and performance.
Follow us on Facebook for more parts.