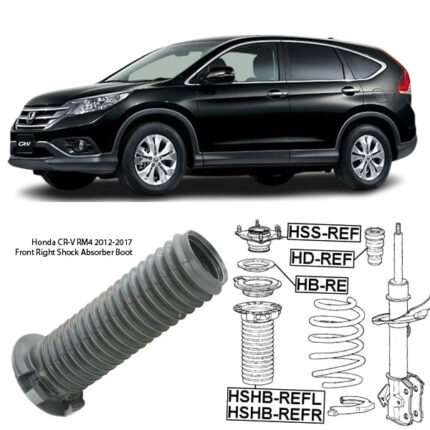
Get Honda CR-V RM4 2012-2017 Front Right Shock Absorber Boot HSHB-REFR in Kenya
When it comes to maintaining your vehicle’s suspension system, one of the often-overlooked but essential components is the shock absorber boot. Specifically, the Front Right Shock Absorber Boot plays a critical role in protecting your shock absorber from dirt, debris, and damage.
In this guide, we’ll dive deep into what a Front Right Shock Absorber Boot is, its functions, signs of wear, replacement process, and why keeping it in good condition is crucial for your car’s performance.
What is a Front Right Shock Absorber Boot?
The Front Right Shock Absorber Boot is a rubber or plastic cover that fits over the piston rod of the shock absorber. It acts as a protective barrier to prevent dirt, moisture, and road debris from reaching the sensitive components inside the shock absorber.
Location: Found on the front right suspension of your vehicle.
Material: Made of rubber, plastic, or thermoplastic elastomers (TPE).
Purpose: Prevents premature wear and damage to the shock absorber.
While small and often unnoticed, a damaged or missing shock absorber boot can lead to shock failure, reducing ride quality and vehicle control.
Functions of a Shock Absorber Boot
The shock absorber boot isn’t just there for looks—it serves critical functions to keep your suspension system working efficiently.
Protects the Shock Absorber Piston Rod
- Keeps dirt, sand, mud, and road salt from entering the shock absorber.
- Prevents corrosion and rust on metal parts.
Extends the Lifespan of the Shock Absorber
- Reduces wear and tear by blocking contaminants.
- Prevents fluid leaks by keeping the piston seal intact.
Maintains Suspension Efficiency
- Ensures the shock absorber operates smoothly without resistance.
- Prevents premature failure due to dirt buildup or rust.
Reduces Noise & Vibration
- Minimizes squeaking or rattling from loose suspension components.
- Absorbs some of the road vibrations for a smoother ride.
Symptoms of a Worn or Damaged Shock Absorber Boot
Since the shock absorber boot protects the internals of the shock, a damaged boot can cause major suspension issues over time. Here are some warning signs:
Cracked or Torn Boot
If the boot is cracked, torn, or missing, dirt and moisture can enter the shock absorber, leading to premature wear.
Grease or Oil Leaks
A damaged boot allows contaminants inside the shock, which can cause seal failure and oil leaks from the shock absorber.
Increased Suspension Noise
A loose, torn, or missing boot can result in clunking, squeaking, or rattling noises, especially when driving over bumps.
Rougher Ride Quality
A failing boot can cause the shock absorber to lose efficiency, leading to a bumpy and uncomfortable ride.
Faster Shock Absorber Wear
Without protection, the shock’s piston rod is exposed to debris, increasing the risk of corrosion and failure.
Ignoring a damaged shock boot can lead to complete shock absorber failure, costing you more in repairs!
How to Replace a Front Right Shock Absorber Boot
Replacing a shock absorber boot is a moderate-level DIY job that requires removing the shock absorber. If you’re not comfortable with suspension work, it’s best to have a professional mechanic handle it.
Tools & Equipment Needed
Jack & Jack Stands
Lug Wrench
Socket Set & Ratchet
Torque Wrench
Spring Compressor (if needed)
New Shock Absorber Boot
Penetrating Oil (for rusted bolts)
Step-by-Step Replacement Process
Secure the Vehicle & Lift the Front Right Side
- Park on a level surface and apply the handbrake.
- Loosen the front right wheel lug nuts before lifting the car.
- Use a jack and jack stands to safely lift and support the vehicle.
Remove the Front Right Wheel & Shock Absorber
- Take off the wheel to access the shock absorber.
- Unbolt the shock absorber mounting bolts from the chassis and suspension.
- Carefully remove the shock absorber from its position.
Remove the Old Shock Absorber Boot
- Inspect the old boot for tears, cracks, or dirt buildup.
- Slide off the damaged boot from the shock absorber’s piston rod.
Install the New Shock Absorber Boot
- Place the new boot over the piston rod.
- Ensure a secure fit to protect against dirt and debris.
Reinstall the Shock Absorber
- Position the shock absorber back into place.
- Tighten all mounting bolts to the manufacturer’s torque specifications.
Reattach the Wheel & Lower the Vehicle
- Secure the wheel and lug nuts.
- Lower the vehicle and torque the lug nuts properly.
Test Drive & Check for Issues
- Drive over bumps and uneven roads to check for any unusual noises.
- Ensure the suspension feels smooth and stable.
Choosing the Right Shock Absorber Boot
When selecting a replacement boot, consider these factors:
Vehicle Compatibility – Check your car’s make and model for the correct fit.
Material Quality – Choose rubber or thermoplastic elastomers (TPE) for durability.
Brand Reliability – Stick to trusted brands like KYB, Monroe, Bilstein, or OEM parts.
Weather Resistance – Ensure the boot can withstand extreme temperatures and road conditions.
Why a Good Shock Absorber Boot Matters
Though small, the shock absorber boot plays a crucial role in protecting your suspension system.
Key Takeaways:
Prevents dirt and moisture from damaging the shock absorber.
Extends the lifespan of the shock absorber by reducing wear.
Maintains smooth ride quality and better handling.
Reduces noise and vibration for a more comfortable drive.
Helps avoid costly shock absorber replacements.
Don’t ignore a damaged shock boot! Regular inspection and timely replacement will save you money and keep your vehicle’s suspension in top shape.
Follow us on Facebook for more parts.