")
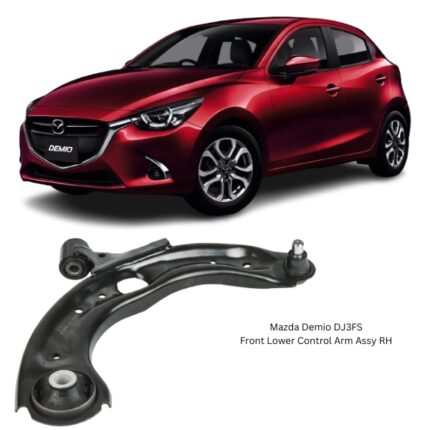
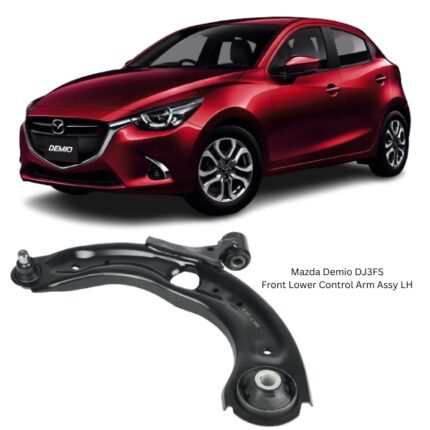
Get Mazda Demio DJ3FS Front Lower Control Arm Assy LH DA7H-34-350B in Kenya
The Front Lower Control Arm Assembly LH (Left-Hand) is a foundational component in a vehicle’s front suspension system. It is responsible for connecting the front-left wheel hub (or steering knuckle) to the vehicle’s chassis or subframe. By doing so, it enables controlled wheel motion while maintaining stability, alignment, and comfort during driving. This component plays a vital role in both everyday vehicle handling and safety.
Understanding its structure, function, wear symptoms, replacement, and maintenance can help vehicle owners and technicians ensure optimal suspension performance, reduce tire wear, and improve ride quality.
1. What Is the Front Lower Control Arm Assembly LH?
The Front Lower Control Arm Assembly LH is an L- or A-shaped suspension link designed for the left-hand (driver’s side) of the vehicle. It functions as a pivoting arm that allows the front wheel to move up and down while maintaining its fixed position front-to-back and side-to-side. It absorbs road forces, supports alignment angles, and contributes to steering and braking control.
The assembly typically consists of:
-
A metal arm body (steel, aluminum, or iron),
-
Rubber or polyurethane bushings at the inner pivot points,
-
An integrated ball joint at the outer connection to the steering knuckle.
This control arm is designed specifically for the left front side and is not interchangeable with the right-hand component due to differences in shape, geometry, and mounting configurations.
2. Primary Functions
The control arm performs several essential roles in vehicle dynamics:
a) Maintaining Suspension Geometry
-
Keeps the left front wheel in correct position relative to the vehicle body.
-
Maintains accurate camber and caster angles necessary for proper alignment.
b) Absorbing Road Forces
-
Transfers forces from the wheel (bumps, potholes, braking stress) to the frame.
-
Dampens vibrations and noise, improving ride comfort.
c) Supporting Steering and Braking
-
Works with the ball joint to enable smooth up-and-down and steering motions.
-
Provides structural rigidity during hard turns or emergency braking.
3. Key Components
a) Control Arm Body
-
The main structure that connects the chassis to the wheel hub.
-
Often reinforced with ribs or stamped designs for added strength.
b) Bushings
-
Made from rubber or polyurethane.
-
Allow pivoting movement and isolate vibrations.
-
Positioned where the arm bolts to the vehicle’s frame or subframe.
c) Ball Joint
-
Spherical joint connecting the arm to the steering knuckle.
-
Allows both suspension travel and steering rotation.
4. LH vs. RH Control Arms – Why They’re Different
Control arms are side-specific due to:
-
Asymmetrical suspension layouts.
-
Different ball joint angles and bushing orientations.
-
Sway bar linkage positions.
Installing an RH arm on the LH side or vice versa can result in severe alignment issues, poor handling, and potential component interference. Always verify the correct side before installation.
5. Construction Materials
-
Forged Steel – Strong and durable; ideal for heavy-duty or rugged applications.
-
Aluminum Alloy – Lightweight and corrosion-resistant; common in performance and luxury vehicles.
-
Cast Iron – Durable, though heavier; less common in modern vehicles due to weight concerns.
Each material is selected based on vehicle class, performance demands, and cost-efficiency.
6. Symptoms of a Failing Front Lower Control Arm LH
Control arm failure typically arises from worn bushings or a degraded ball joint. Warning signs include:
-
Clunking or Banging Noises
-
Especially when going over bumps or turning sharply.
-
-
Uneven or Rapid Tire Wear
-
Caused by misalignment due to play in the control arm.
-
-
Steering Pull or Drift
-
The vehicle may pull to one side during driving or braking.
-
-
Vibrations in the Steering Wheel
-
Often due to a worn or loose ball joint.
-
-
Visible Wear or Damage
-
Torn bushings, rust, or a bent arm on visual inspection.
-
7. Causes of Damage or Wear
-
Wear and Tear: Rubber bushings deteriorate with time and usage.
-
Impact Damage: Striking potholes, curbs, or debris can bend or fracture the control arm.
-
Corrosion: Exposure to water, salt, and mud accelerates rust and structural weakening.
-
Overloading: Heavy loads stress the suspension beyond its limits.
-
Lack of Maintenance: Ignoring alignment issues and worn components accelerates damage.
8. Inspection and Diagnosis
Mechanics use several methods to check the health of a control arm:
-
Visual Inspection: Look for cracked bushings, rust, or physical deformation.
-
Pry Bar Test: Leverage applied to the arm to test for excess play in the bushings or ball joint.
-
Tire Wear Patterns: Irregular tread wear often indicates alignment and suspension issues.
-
Test Drive Observations: Listen for noises and assess steering response during motion.
9. Replacing the Front Lower Control Arm LH
If inspection reveals that the control arm or its components are worn or damaged, replacement is necessary. Modern control arms often come as complete assemblies with pre-installed bushings and ball joints for easier service.
Tools Required:
-
Floor jack and stands
-
Socket and wrench set
-
Ball joint separator
-
Pry bar
-
Torque wrench
Basic Steps:
-
Lift Vehicle and Remove Wheel – Secure the vehicle safely and remove the front-left tire.
-
Disconnect Ball Joint – Use a separator tool to detach from the knuckle.
-
Unbolt Control Arm – Remove the bolts securing it to the subframe or crossmember.
-
Remove Arm – Carefully remove from suspension assembly.
-
Install New Arm – Align properly and secure with new bolts.
-
Reconnect Ball Joint and Torque All Bolts
-
Reinstall Wheel and Lower Vehicle
-
Perform Alignment – Essential to restore proper geometry and prevent tire wear.
Note: Always follow torque specifications and manufacturer instructions during installation.
10. Maintenance Tips
-
Regular Inspection: During oil changes or tire rotations, check for play in the suspension.
-
Drive Gently: Avoid curbs, potholes, and rough terrain when possible.
-
Keep Undercarriage Clean: Wash away road salt and mud to prevent corrosion.
-
Replace in Pairs: For consistent performance, replace both LH and RH arms together if one is worn.
Follow us on Facebook for more parts.
Reviews
Clear filtersThere are no reviews yet.