")
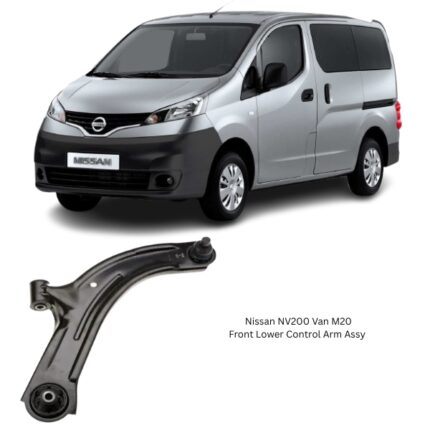
Get Nissan NV200 Front Lower Control Arm Assy LH 54501-EL000 in Kenya
The Front Lower Control Arm Assembly LH is a suspension linkage located on the front-left (driver’s side) of the vehicle. It forms a pivoting connection between the vehicle’s frame (or subframe) and the left front wheel. It houses rubber or polyurethane bushings on the frame side and a ball joint on the wheel side.
Its function is to control the motion of the wheel, manage alignment angles (like camber and caster), and absorb road shocks while allowing for necessary suspension articulation during driving, braking, and turning.
2. Design and Construction
A typical Front Lower Control Arm LH includes:
-
Arm Body: Shaped as an “A”, “L”, or wishbone, depending on vehicle design. It’s made from forged aluminum, stamped steel, or cast iron, balancing strength and weight.
-
Bushing Mounts: These are sleeves or eyes where the arm bolts to the chassis, each housing a rubber or polyurethane bushing that allows for flexible motion.
-
Ball Joint Mount: Located on the outer side of the arm, it connects to the steering knuckle and enables both pivot and rotational movement.
-
Sway Bar Link Mount (Optional): Some designs integrate an additional bracket to connect the sway bar link for added suspension stiffness.
3. Functionality
The Front Lower Control Arm LH is responsible for the following critical functions:
a) Wheel Movement Control
It guides the up-and-down movement of the left front wheel while ensuring it stays properly aligned with the chassis, crucial for predictable handling.
b) Steering and Cornering Stability
The control arm helps maintain proper geometry as the vehicle turns, preventing excessive camber changes that might reduce traction or cause instability.
c) Absorbing Impact and Vibration
Its bushings and structural design reduce the transmission of road vibrations and shocks to the cabin, promoting comfort and durability.
d) Suspension Geometry Maintenance
By maintaining consistent suspension geometry, it plays a key role in tire wear, alignment settings, and overall vehicle dynamics.
4. Advantages of a High-Quality LH Lower Control Arm
-
Precision Handling: Maintains proper camber and caster angles, enabling tight, predictable steering.
-
Reduced Tire Wear: Prevents uneven or premature tire wear by keeping the wheel aligned with factory specifications.
-
Ride Comfort: Quality bushings absorb harshness, reducing cabin noise and increasing comfort.
-
Long-Term Durability: Strong materials resist fatigue, corrosion, and damage from road impacts.
-
Safety Assurance: A properly functioning control arm maintains proper contact between tires and the road, essential during braking or emergency maneuvers.
5. Signs of a Worn or Failing Control Arm Assembly LH
Several warning signs can indicate that the front lower control arm on the left-hand side is worn or failing:
-
Clunking Noises – Especially when driving over bumps or during turns, caused by loose or deteriorated bushings or a failing ball joint.
-
Poor Steering Response – The vehicle may feel loose or imprecise in handling, especially around corners.
-
Pulling to One Side – If the left control arm is damaged, it may cause the vehicle to drift or pull to that side.
-
Vibration in the Steering Wheel – Especially at higher speeds or during braking, indicating misalignment or worn joints.
-
Irregular Tire Wear – The front-left tire may show inner or outer edge wear due to misalignment caused by a failing arm.
6. Causes of Damage and Wear
-
Normal Wear: Over time, bushings degrade and ball joints loosen due to constant motion and stress.
-
Impact Damage: Hitting a pothole, curb, or speed bump aggressively can bend or fracture the control arm.
-
Rust and Corrosion: In humid or salted environments, steel arms can rust and lose strength if unprotected.
-
High Loads: Overloading the vehicle stresses the suspension system and accelerates wear.
7. Replacing the Front Lower Control Arm LH
Replacing the control arm is a common suspension repair that requires moderate mechanical skill and proper tools.
Tools Required:
-
Jack and jack stands
-
Lug wrench
-
Socket set and ratchet
-
Torque wrench
-
Ball joint separator
-
Pry bar
Procedure:
-
Safety First: Park on a flat surface and apply the handbrake. Use chocks for added safety.
-
Lift the Vehicle: Jack up the front-left side and secure it with jack stands.
-
Remove the Wheel: Exposes the control arm and surrounding components.
-
Disconnect the Ball Joint: Use a separator tool to release it from the steering knuckle.
-
Remove Mounting Bolts: Unbolt the arm from the chassis or subframe.
-
Install New Arm: Align and secure the replacement arm in the same orientation.
-
Reconnect Ball Joint: Torque to spec to ensure secure steering and suspension operation.
-
Reinstall the Wheel and Lower the Car
-
Get a Wheel Alignment: Crucial to reset suspension geometry and prevent tire wear.
8. Maintenance Tips
-
Inspect During Oil Changes: Look for cracking bushings, rust, or play in the ball joint.
-
Wash the Undercarriage: Especially after driving on salted or muddy roads.
-
Drive Responsibly: Avoid aggressive driving, especially on rough terrain.
-
Lubricate Joints: If applicable, use grease fittings to extend ball joint life.
-
Address Symptoms Promptly: Any knocking, vibration, or steering problems should be checked early to avoid further damage.
9. Differences Between LH and RH Lower Control Arms
Although they look similar, left-hand (LH) and right-hand (RH) control arms are side-specific due to:
-
Orientation: Each arm is shaped and angled to match the contours and mounting geometry of its respective side.
-
Ball Joint Placement: The angle and reach differ based on steering layout and suspension design.
-
Bushing Configuration: The layout of bushing mounts is mirrored for left vs. right.
Installing the wrong side can cause misalignment, handling issues, and even safety hazards.
Follow us on Facebook for more parts.

Reviews
Clear filtersThere are no reviews yet.